RADIUS service
Before the FortiAuthenticator unit can accept RADIUS authentication requests from a FortiGate unit, the FortiGate unit must be registered as a authentication client on the FortiAuthenticator unit.
The FortiAuthenticator RADIUS server is already configured and running with default values. Each user account on the FortiAuthenticator unit has an option to authenticate the user using the RADIUS database.
Every time there is a change to the list of RADIUS authentication clients, two log messages are generated: one for the client change, and one to state that the RADIUS server was restarted to apply the change.
FortiAuthenticator unit allows both RADIUS and remote authentication for RADIUS authentication client entries. If you want to use a remote server, you must configure it first so that you can be select it in the RADIUS authentication client configuration, see Remote authentication servers on page 1. You can configure the built-in LDAP server before or after creating client entries, see LDAP service on page 1.
|
|
For VM appliances, the ratio for RADIUS clients has been increased from "number of max users / 10" to "number of max users / 3". The number of RADIUS profiles has also been increased from "number of max users / 10" to "number of max users x 2", since each RADIUS client might need more than one profile. See the Maximum values table included in the latest FortiAuthenticator Release Notes for more details. |
Clients
RADIUS accounting client can be managed from Authentication > RADIUS Service > Clients.
Clients can be added, imported, deleted, edited, and cloned as needed.
To configure a RADIUS accounting client:
- From the RADIUS client list, select Create New to add a new RADIUS client. The Add RADIUS client window opens.
- Enter the following information:
|
|
Subnets and IP ranges can be defined in the Client address field. All Auth Clients within a defined subnet/IP range will share the same configuration and secret. For example, 192.168.0.0/24 would allow all 255 IP addresses to authenticate. This feature saves time, as the entry only takes up a single client entry in the license table. |
- Select OK to add the new RADIUS client.
|
|
If authentication is failing, check that the authentication client is configured and that its IP address is correctly specified. Common causes of problems are:
|
Challenge message to Support FTM Push for VPN Clients
There are two new Reply-Messages that the FortiAuthenticator can send to the FortiGate in the RADIUS ACCESS CHALLENGE messages from the FAC to the FGT. Each message is prefixed by an uneditable string followed by an editable string (i.e., replacement message in FAC):
- If push is not available, FAC will send Prefix: “” followed by Default Replaceable String: “Enter Token Code”. For example; "Enter Token Code".
- If push is available, FAC will send Prefix: “+” followed by Default Replaceable String: “Choose FTM Push or Enter Token Code”. For example:;" + Choose FTM Push or Enter Token Code".
Client profile attributes
FortiAuthenticator supports a single authentication profile for each RADIUS Auth Client. Because of this, authentication requirements (for example IPSec/SSLVPN, Web Filtering Override, Wireless Authentication, and so on) require different profiles, as RADIUS authentication requests originate from the same IP address. To distinguish the authentication requirements, you can add attributes to them.
Attributes (which can be added to authentication requirements) indicate the type of service the user has requested, or the type of service to be provided.
|
|
Each FortiAuthenticator Auth Client Profile can contain up to two RADIUS Attributes. To match a profile, all specified attributes in a profile must match, if not, the processing will fall to the next profile (processed in top down order). |
The profiles created can be re-arranged in terms of priority. FortiAuthenticator attempts to match the RADIUS attributes from an authentication request to each profile, starting with the highest-priority profile, and moves down the list until it finds a match. FortiAuthenticator uses the first profile that it matches.
Importing authentication clients
Authentication client information can be imported as a CSV file by selecting Import from the RADIUS client list.
The CSV file has one record per line, with the record format: client name (32 characters max), FQDN or IP address (128 characters max), secret (optional, 63 characters max).
Extensible authentication protocol
The FortiAuthenticator unit supports several IEEE 802.1X EAP methods. EAP settings can be configured from Authentication > RADIUS Service > EAP. See EAP for more information.
Services
You can optionally change the RADIUS authentication, accounting SSO, and accounting monitor ports under Authentication > RADIUS Service > Services.
By default, the ports are set to:
- RADIUS authenticaiton port: 1812
- RADIUS accounting SSO port: 1813
- RADIUS accounting monitor port: 1646
|
|
When upgrading from a firmware version prior to 5.0, and the Enable RADIUS Accounting SSO clients option is enabled under Fortinet SSO Methods > SSO > General, both the SSO accounting port and the usage monitoring accounting port should remain at their default values (1813 and 1646 respectively) in order to avoid service disruption. |
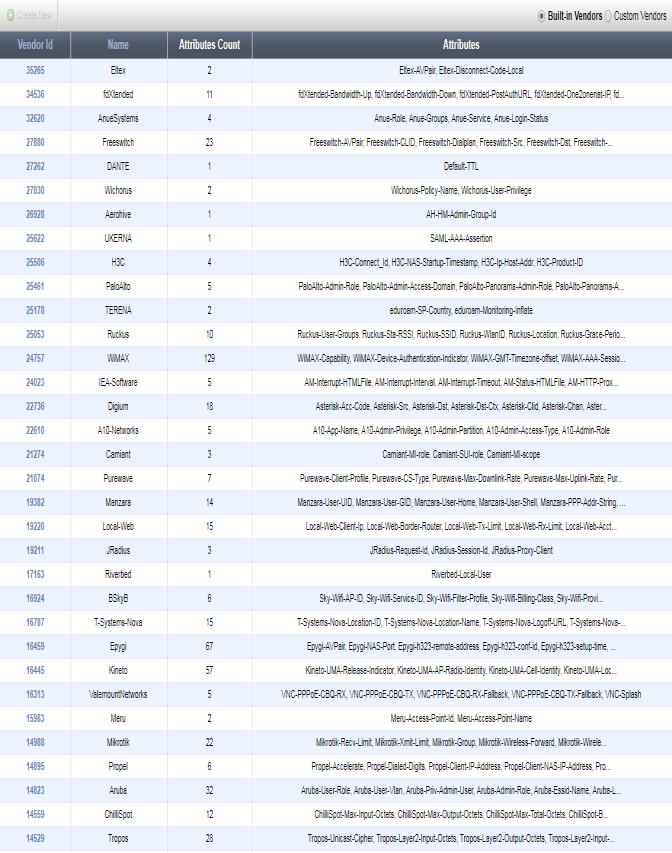
Custom Dictionaries
The custom dictionary list enables you to view built-in vendors and their RADIUS attributes, and create new customized entries.
Go to Authentication > RADIUS Service > Custom Dictionaries to view the list.
Some services can receive information about an authenticated user through RADIUS vendor-specific attributes. FortiAuthenticator user groups and user accounts can include RADIUS attributes for Fortinet and other vendors.
Attributes in user accounts can specify user-related information. For example, the Default attribute Framed-IP-Address specifies the VPN tunnel IP address to be sent to the user by the Fortinet SSL VPN.
Attributes in user groups can specify more general information, applicable to the whole group. For example, specifying third-party vendor attributes to a switch could enable administrative level login to all members of the Network_Admins group, or authorize the user to the correct privilege level on the system.
To create a new custom RADIUS attribute vendor, open the Custom Vendors view and select Create New where you will be prompted to upload a RADIUS dictionary file.
To add RADIUS attributes to a user or group:
- Go to Authentication > User Management > Local Users and select a user account to edit, or go to Authentication > User Management > User Groups and select a group to edit.
- In the RADIUS Attributes section, select Add Attribute. The Create New User Group RADIUS Attribute or Create New User RADIUS Attribute window opens.
- Select the appropriate Vendor and Attribute ID, then enter the attribute’s value in the Value field.
- Select OK to add the new attribute to the user or group.
- Repeat the above steps to add additional attributes as needed.
Copyright © 2018 Fortinet, Inc. All Rights Reserved. | Terms of Service | Privacy Policy
